> For the complete documentation index, see [llms.txt](https://blog.mantago.cc/zh/llms.txt). Markdown versions of documentation pages are available by appending `.md` to page URLs; this page is available as [Markdown](https://blog.mantago.cc/zh/she-qun-bang-ding/bang-ding-line.md).
# 綁定 Line
準備將聊天機器人綁定Line帳號囉!
如果您本來就有LINE官方帳號,請看 [https://app.gitbook.com/o/BewEbXJDNMghmGAwcInV/s/ZHbJqepBvWr0vRrToIqo/she-qun-bang-ding/yi-you-lai-guan-fang-zhang-hao-ru-he-bang-ding-mantago](/zh/she-qun-bang-ding/yi-you-lai-guan-fang-zhang-hao-ru-he-bang-ding-mantago.md)
還沒有建立過LINE官方帳號請繼續閱讀~
首先進入聊天機器人的首頁,點擊左側手機右上角的「設定」按鍵:
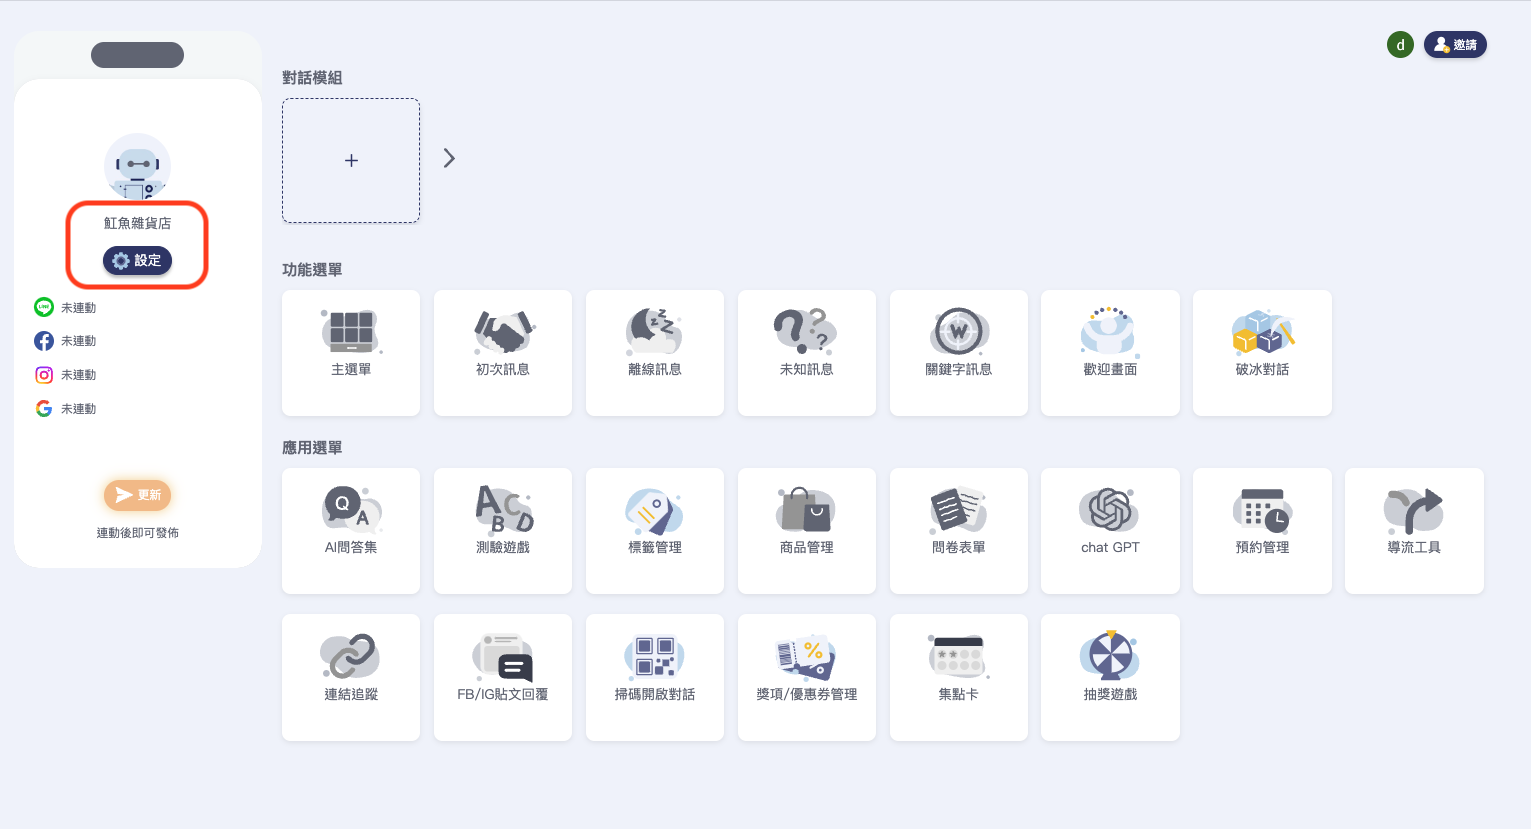 到右下方Line官方帳號的區塊,點擊「連接Line渠道」按鍵:
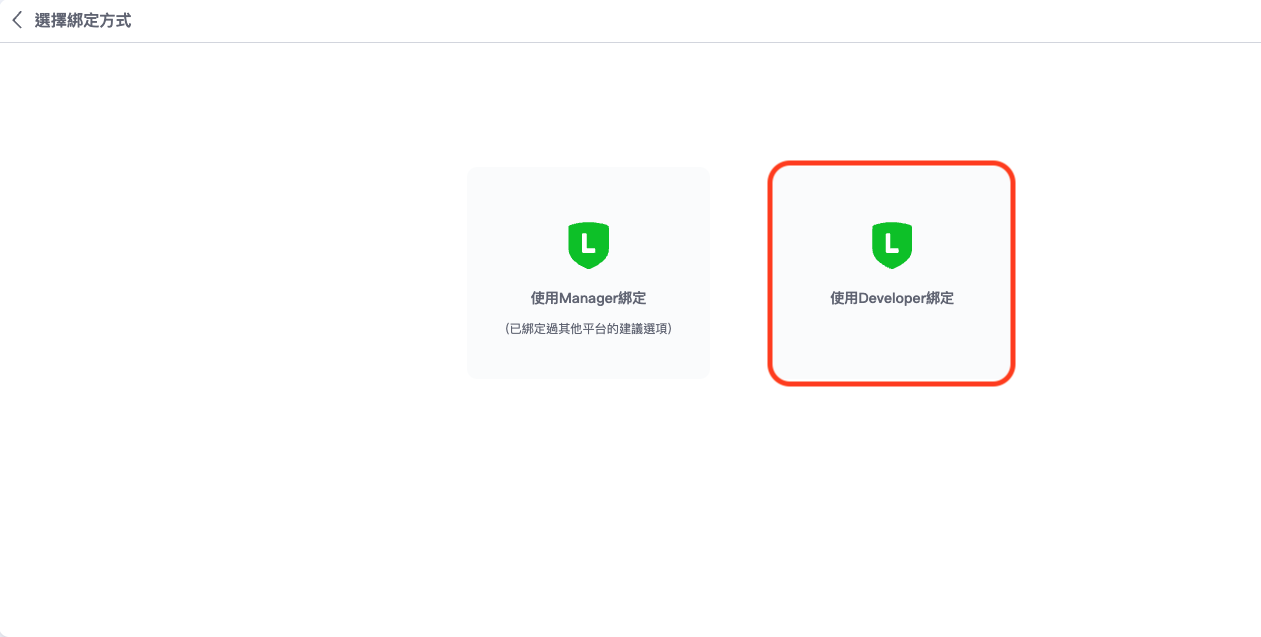
 接下來選擇綁定方式,如果對聊天機器人較不熟悉,或是沒有綁定Facebook粉絲專頁,建議使用右邊的Developer綁定:
 ### 跟著四步驟,完成line綁定
### Step1 設定Line developer console
### 跟著四步驟,完成line綁定
### Step1 設定Line developer console
 {% hint style="info" %}
小提醒 \
1.若有 LINE@ 帳號,可直接登入 \
2.沒有的話,記得準備一個 LINE@ 帳號
{% endhint %}
### 進入Line Developers
1. 成功登入後,選擇左方列表的Provider
2. 選擇要綁定的聊天機器人Channel,或是新增一個新的Channel
{% hint style="info" %}
小提醒 \
1.若有 LINE@ 帳號,可直接登入 \
2.沒有的話,記得準備一個 LINE@ 帳號
{% endhint %}
### 進入Line Developers
1. 成功登入後,選擇左方列表的Provider
2. 選擇要綁定的聊天機器人Channel,或是新增一個新的Channel
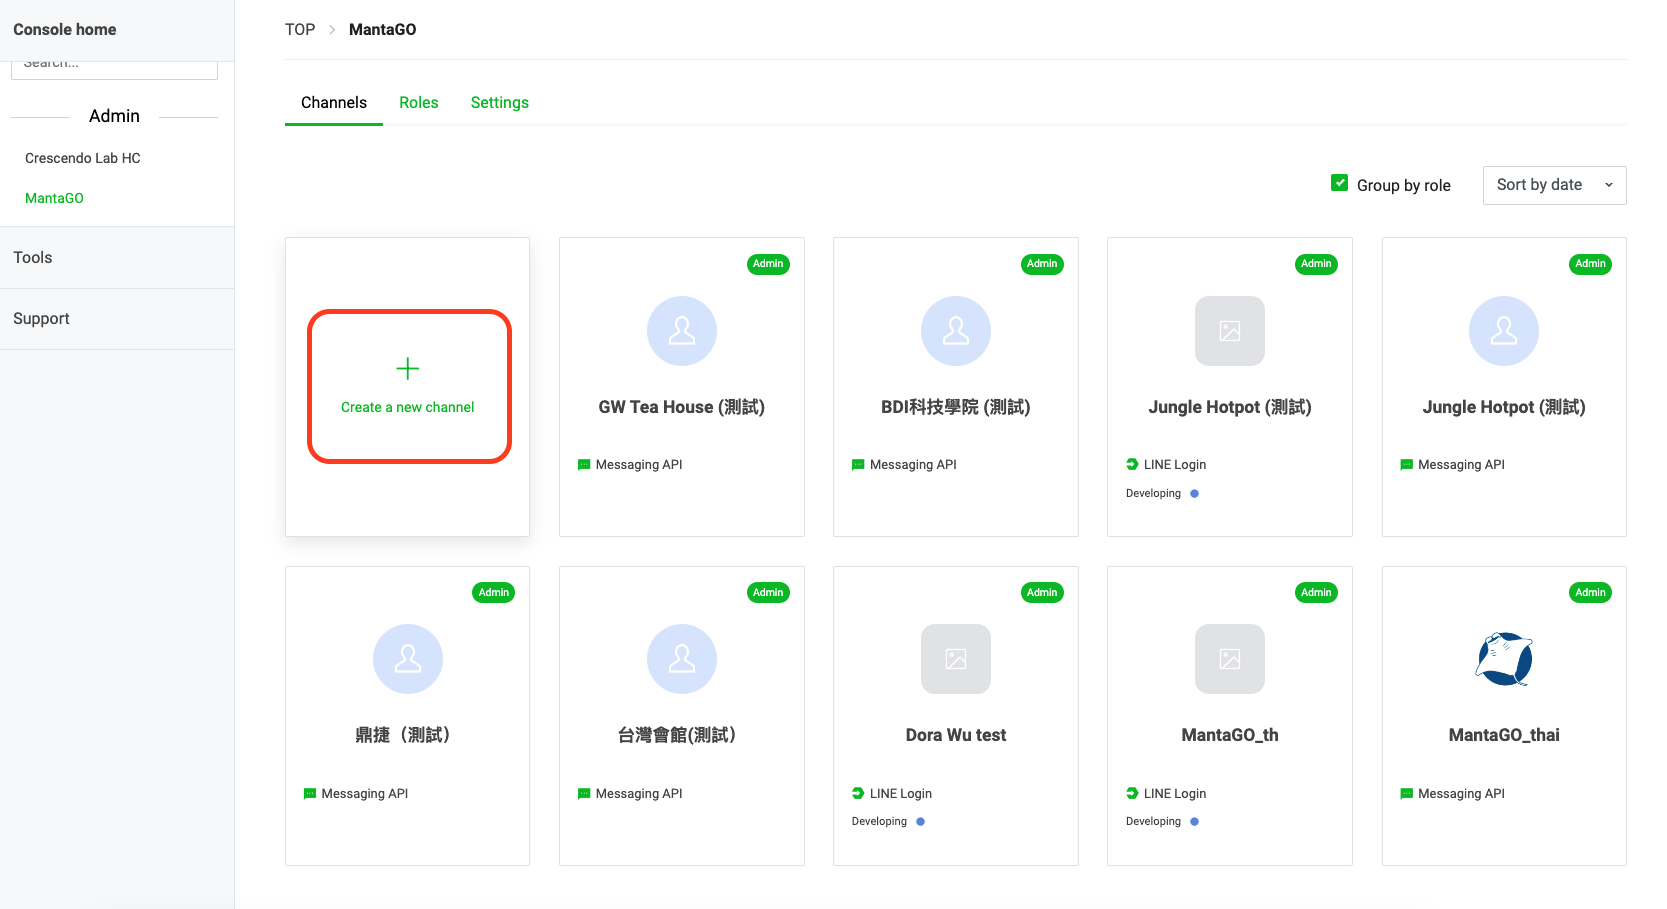 在跳出視窗中,選擇第二個Messaging API
 填寫Channel的基本資訊,記得必填欄位都要填寫完唷!
 ### Messaging API
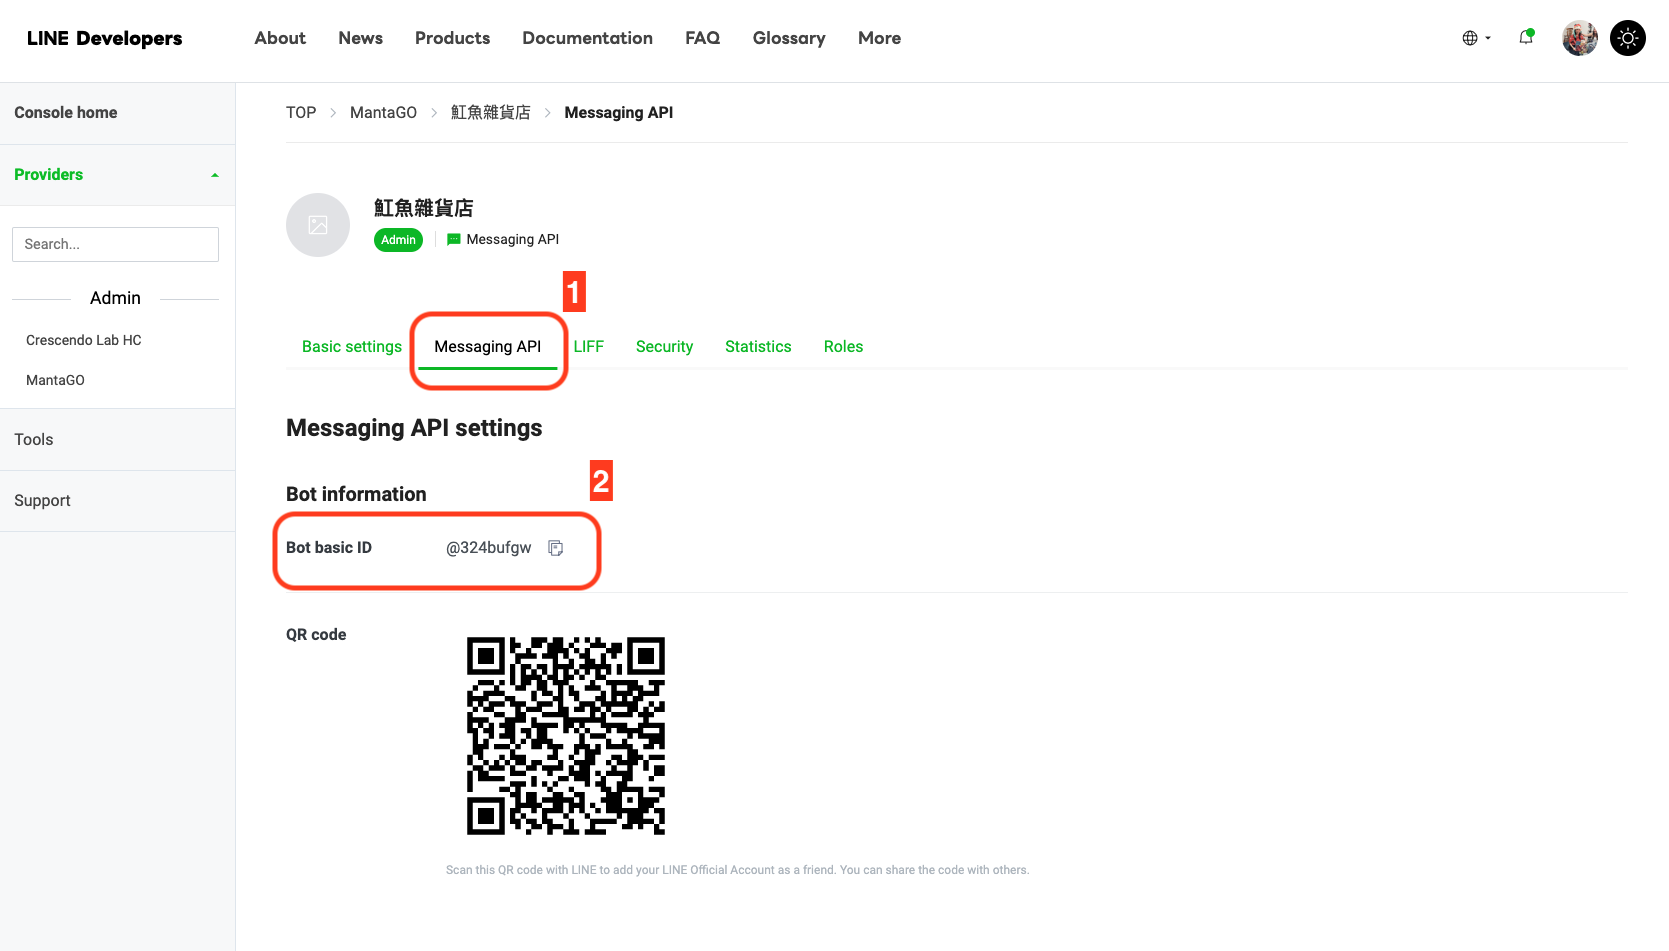
1. 新增好Channel後,進入Messaging API中
2. 複製Bot Basic ID
### Messaging API
1. 新增好Channel後,進入Messaging API中
2. 複製Bot Basic ID
 ### 複製貼上Bot Basic ID
1. 回到MantaGo的頁面,將Bot Basic ID貼到輸入匡中
2. 貼上後,點擊右下方的「下一步」
### 複製貼上Bot Basic ID
1. 回到MantaGo的頁面,將Bot Basic ID貼到輸入匡中
2. 貼上後,點擊右下方的「下一步」
 ***
### Step 2 Webhook URL
###
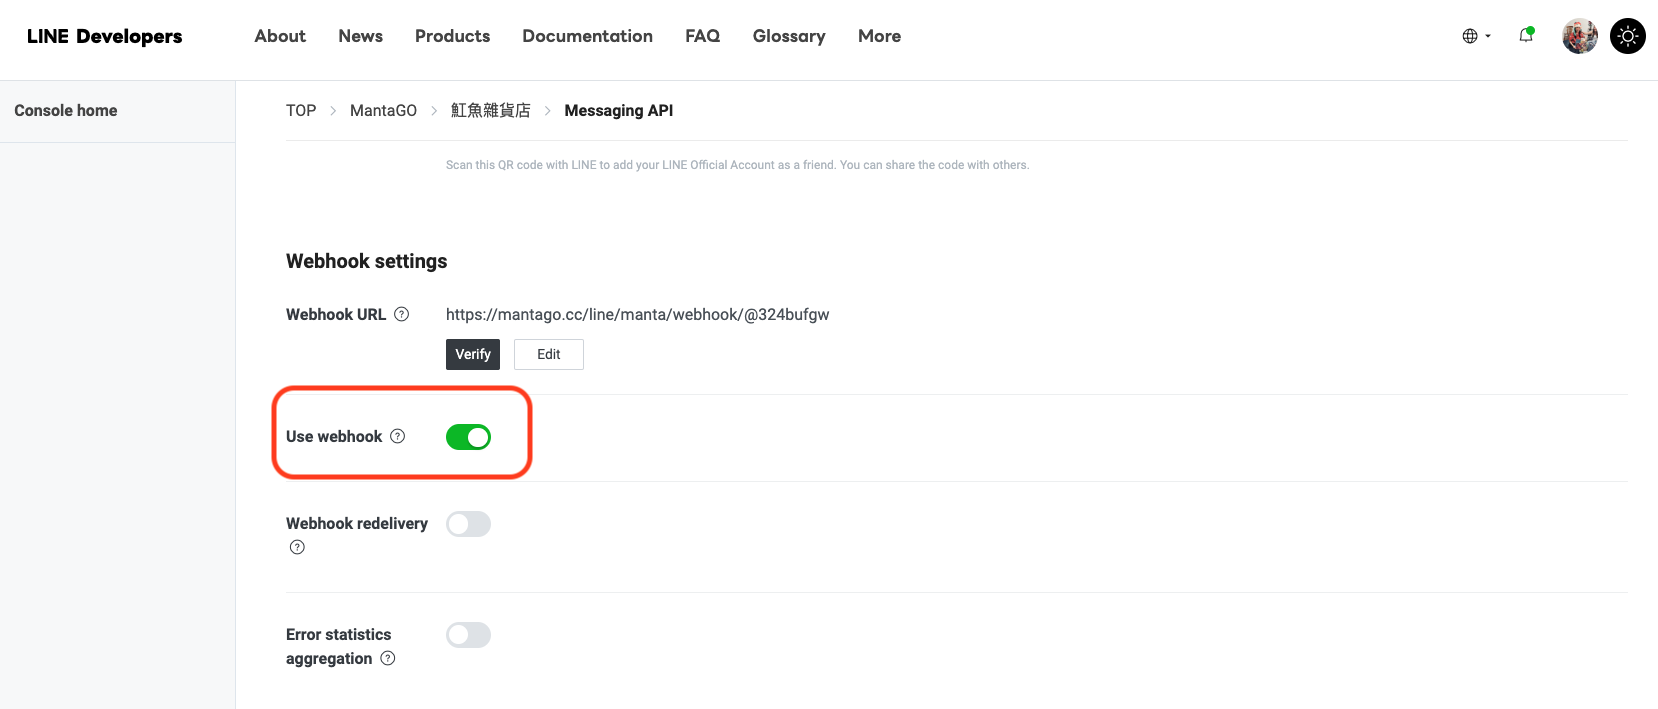
1. 回到Line Developers的畫面,並將頁面往下捲動至Webhook Setting
2. 按下Edit
3. 將複製好的Webhook URL貼到方框中
4. 按下Update按鈕
5. 將Use webhook設定為「開啟」
***
### Step 2 Webhook URL
###
1. 回到Line Developers的畫面,並將頁面往下捲動至Webhook Setting
2. 按下Edit
3. 將複製好的Webhook URL貼到方框中
4. 按下Update按鈕
5. 將Use webhook設定為「開啟」

 ***
### Step3 Channel access token
加油!剩下最後兩個步驟了!
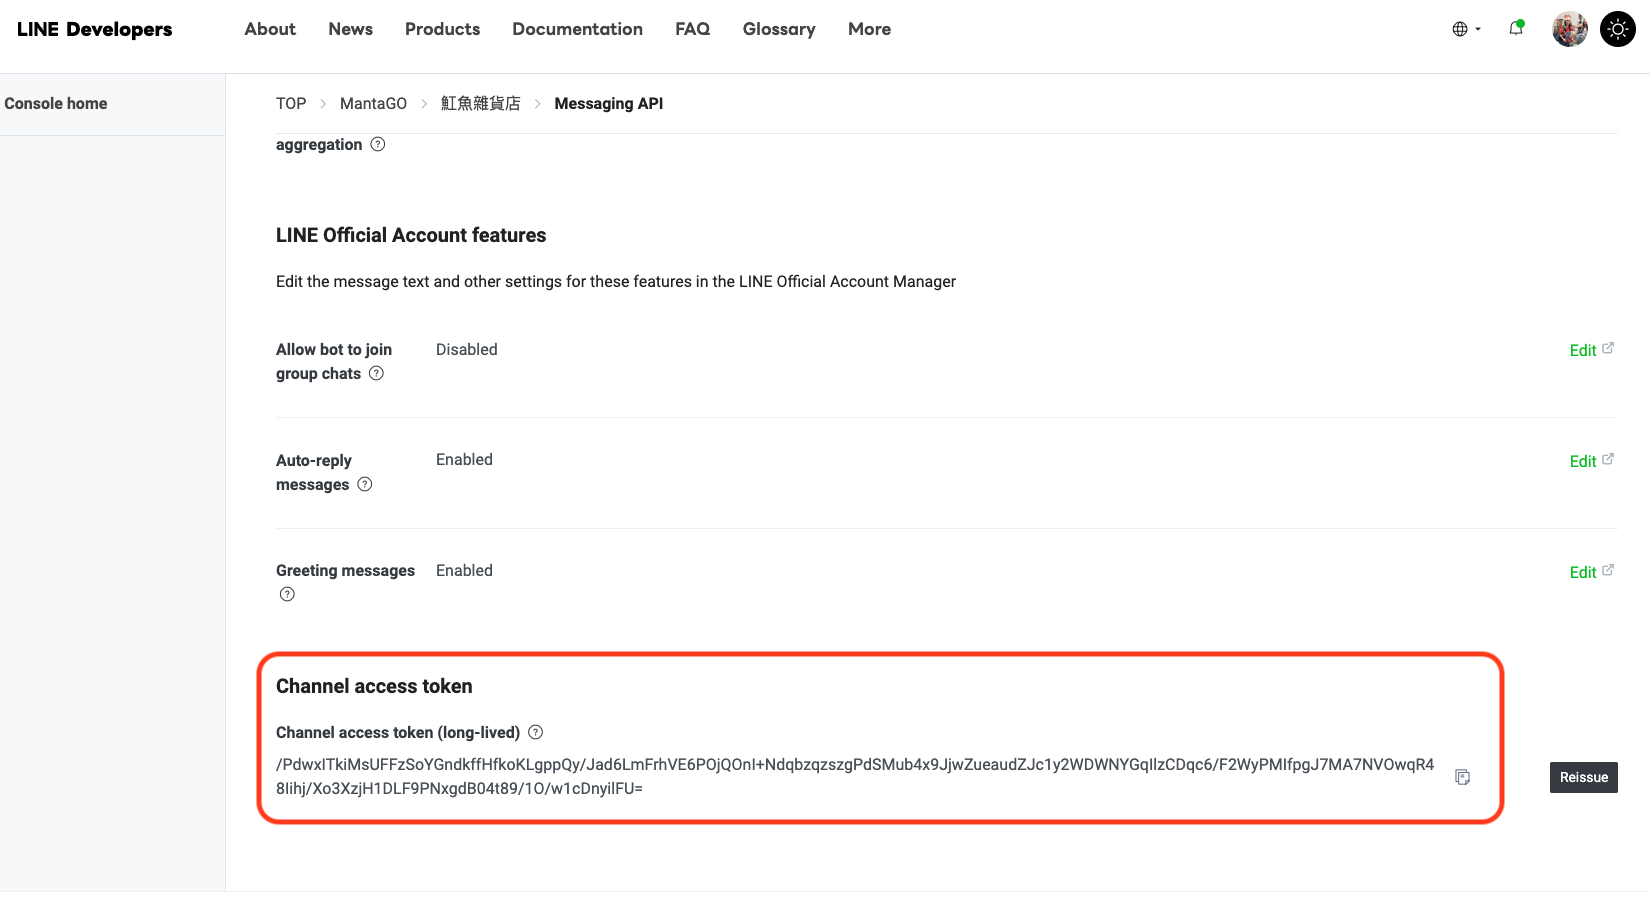
1. 將頁面往下捲動至Channel access token
2. 按下Issue/Reissue的按鈕
3. 將Channel access token複製,並回到MantaGO頁面
***
### Step3 Channel access token
加油!剩下最後兩個步驟了!
1. 將頁面往下捲動至Channel access token
2. 按下Issue/Reissue的按鈕
3. 將Channel access token複製,並回到MantaGO頁面
 ***
### Step4 回覆設定
***
### Step4 回覆設定
點擊連結,進入[Manager](https://manager.line.biz/)頁面
 選擇要綁定的帳號
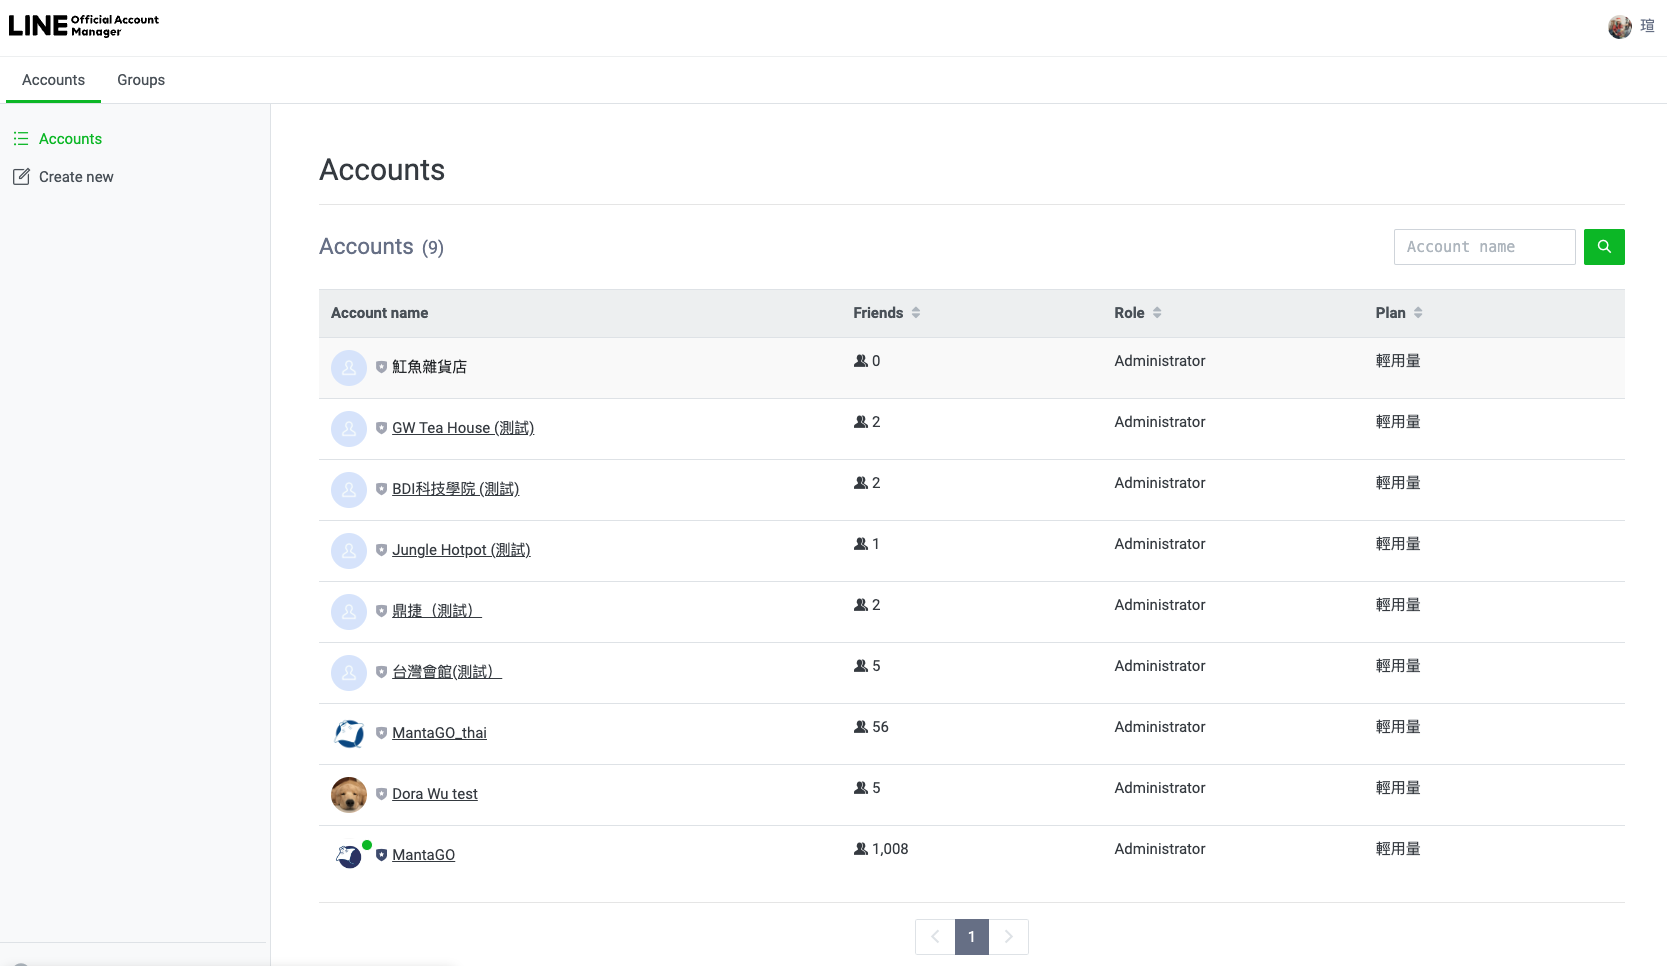 點擊右上方的設定按鈕
 ### 回覆設定
1. 點擊左方的回應設定
2. 將選單中的加入好友的歡迎訊息,設定為停用
3. 將選單中的自動回應訊息,設定為停用
4. 將選單中的Webhook,設定為啟用
### 回覆設定
1. 點擊左方的回應設定
2. 將選單中的加入好友的歡迎訊息,設定為停用
3. 將選單中的自動回應訊息,設定為停用
4. 將選單中的Webhook,設定為啟用
 #### 最後:
1. 點選左上角的主頁
2. 按「自動回覆訊息」
3. 到視窗右邊的「狀態」,將狀態設為關閉
#### 最後:
1. 點選左上角的主頁
2. 按「自動回覆訊息」
3. 到視窗右邊的「狀態」,將狀態設為關閉
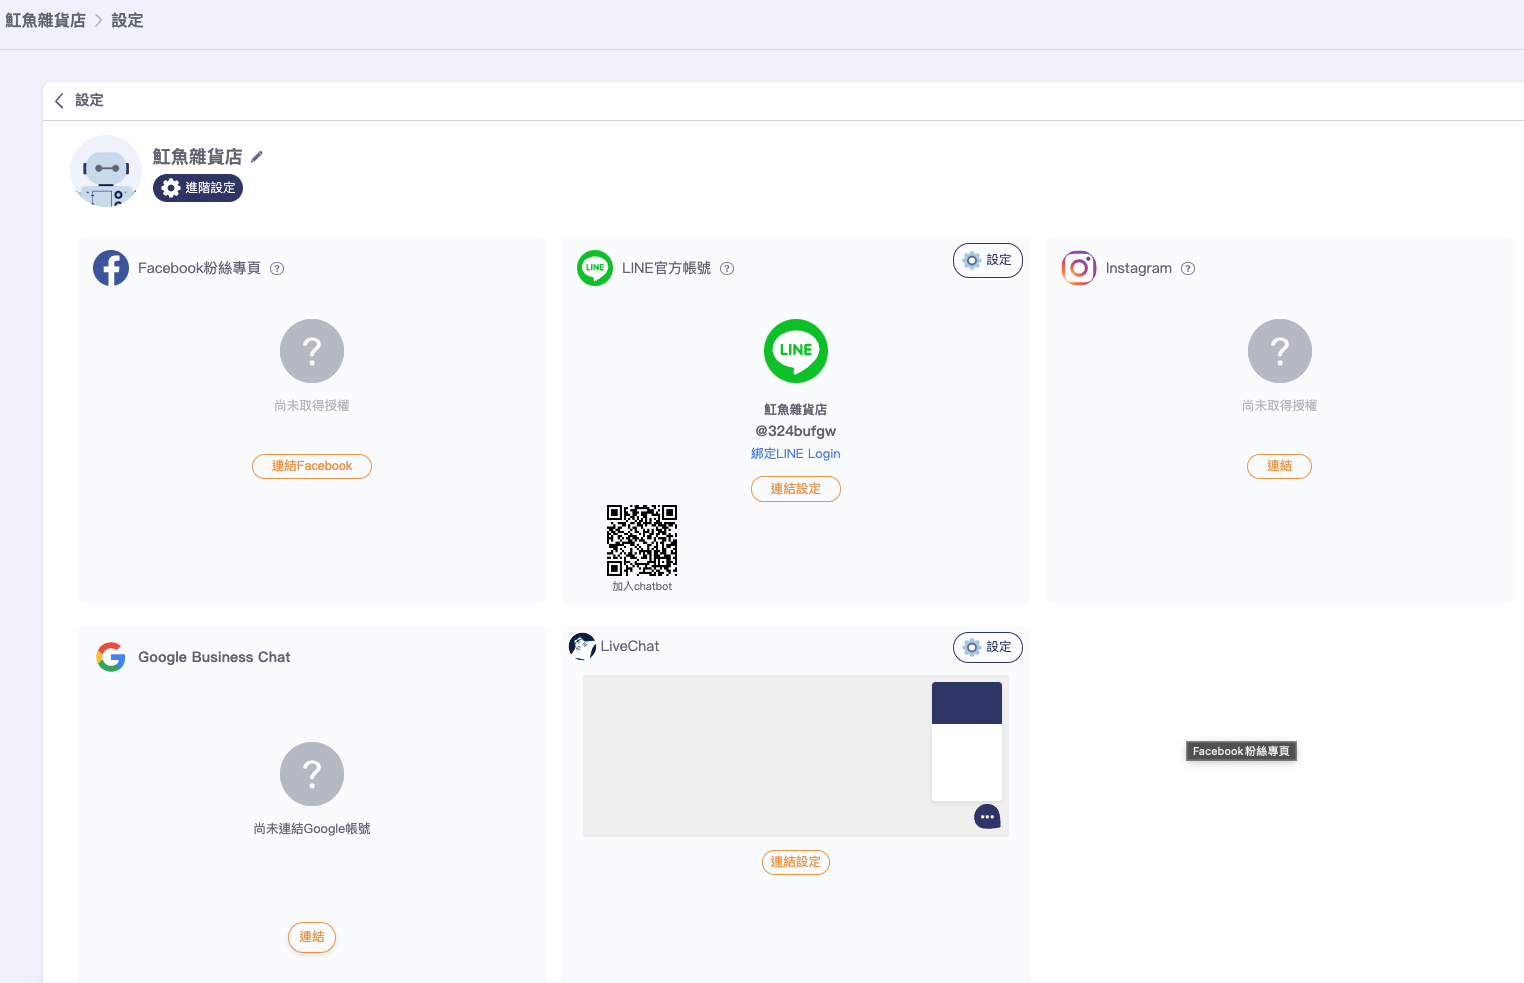
 恭喜你,看到下方畫面就代表Line綁定成功啦!
 #### 參考教學影片
#### LINE官方帳號綁定設定教學:
{% embed url="" %}
### 馬上註冊MantaGO吧!
[
#### 參考教學影片
#### LINE官方帳號綁定設定教學:
{% embed url="" %}
### 馬上註冊MantaGO吧!
[
](https://mantago.cc/login)
\
>
\